AdventureTech, LLC.
Accessories for DL650 and DL1000 Suzuki V-Stroms, Yamaha FJ-09,
Kawasaki Versys X300 and other Adventure Motorcycles
  • Home
  • Parts by Type
    • Skid Plates >
      • SW Motech Skidpan to Givi Crashbar Adapter
    • Brake Pads and Lines >
      • Brake Pads
      • Braided Stainless Brake Lines
      • +2" Brake line Options
    • Chassis >
      • Fork Braces >
        • Fork Brace Reviews
      • Footpeg and Control Lowering Kit
      • Gear Shift Relocation/Extension
      • Passenger Peg Lowering
      • Crash Bars
      • Bolt-on Side Stand Foot >
        • Suzuki Side Stand Foot
        • Yamaha Side Stand Foot
      • Fender Raising Kits >
        • 2012+ DL650 Front Fender Riser
        • 2014+ DL1000 & DL1050 Fender Raising Kit
      • DL1000 Rear Wheel Spacer
    • Suspension >
      • Raising and Lowering Links >
        • Gen 1 and 2 DL650 and Gen 1 DL1000 >
          • About Materials
        • 2014+ DL1000 & DL1050
        • How Much Raise/Lowering do I need?
      • Aftermarket Rear Shocks
    • Electrical Accesories >
      • Signal Dynamics Heads Up Voltage Monitor
      • Switches
      • Connectors
      • Speedometer Correction/Calibrator
    • Lighting and Safety >
      • Auxiliary Lighting >
        • Suzuki Auxiliary LED Lighting >
          • Gen 1 V-Stroms Auxiliary Lighting
          • 2012 to 2016 DL650 Auxiliary Lighting
          • 2017+ DL650 Auxiliary Lighting
          • 2014+/2019 DL1000 Auxiliary Lighting
          • 2020+ DL1050 Auxiliary Lighting
        • Yamaha Auxiliary Lighting
      • Running Light Adaptors for Turn Signals
      • Brake Light Modules >
        • BackOFF™ Brake Light Module
        • BackOFF™ Brake Hold Module
        • BackOFF™ XP Brake Light Module
        • Black Classic Dual LED License Plate Frame w/ Red LEDs & Red Lens
      • Headlight Modulators
    • Handlebar Controls and Mirrors >
      • Handlebar Risers
      • Mirror Extenders >
        • Suzuki Mirror Extenders
        • Yamaha Mirror Extenders
    • Shelves and GPS/Phone Mounts >
      • Auxiliary Shelves (main page) >
        • Typical Items Installed On a Shelves
        • Whats Fits
      • Over the Dash GPS Mounts
      • Over the Dash Shelf
      • Ram Mount Accessories
      • J&M Radio Mount
    • Luggage >
      • Saddle Bag Guards
      • Suzuki Hard Luggage
      • Yamaha Luggage
      • Shad Waterproof Soft Luggage >
        • SHAD 55L Waterproof Rear Travel Bag
        • W0SB42 Waterproof Saddle Bags
        • 38Liter Rear Duffle Bag Large
      • Tank Bags >
        • Givi XS319
        • ST605 5LTR Tank Lock Tank Bag
        • Givi XS307 Tankloc Tank Bag
      • Adventure to Givi Adapter
    • Windshields
    • Exhaust Systems >
      • Arrow Exhausts >
        • Arrow for DL650 2004 to 2011
        • Arrow for 2012 and Newer DL650
        • Arrow for 2014 and newer DL1000
      • Giannelli Exhaust
      • Remus Exhausts
  • Parts by Bike
    • DL650 2004 to 2011
    • DL650 2012 to 2016
    • DL650 2017 +
    • DL1000 2002 to 2013
    • DL1000 2014 to 2019
    • DL1050 2020+
    • DRZ400
    • Yamaha FJ-09/MT-09/Tracer 900 GT
    • Kawasaki Versys X300
  • Installation Instructions and Videos
    • V-Strom Parts Instructions >
      • Mirror Extender Instructions
      • Fork Brace Instructions
      • Footpeg and Control Lowering Instructions
      • Gear Shift Relocation Instructions
      • Bolt-on Kickstand Foot Instructions
      • Raising and Lowering Links >
        • DL650 and Gen 1 DL1000 Raising/Lowering Link Instructions
        • Gen 2 DL1000 Raising & Lowering Plates
      • Shelves and GPS Mounts >
        • Auxiliary Shelf Instructions
        • 1st Gen Strom Over the Dash GPS mount
        • Over the Dash Shelf for 2014+ DL1000
        • 2012 to 2016 DL650 GPS Mount Instructions
        • 2017+ DL650 GPS Mount
      • DL1000 Rear Wheel Spacer Instructions
      • Vee2 Saddlebag Guard
      • Fender Riser 2014+ DL1000
      • Retrieving Missing Parts from the Cowling
      • Auxiliary Lighting >
        • Gen 1 V-Strom Light Bar
        • Auxiliary Light Wiring Harness
        • 2014 and Newer DL1000 Light Bar
        • DL1050 Light Bar
        • V-Strom Wiring 101
    • General Electrical and Lighting >
      • Head's Up™ Voltage Monitor
      • Speedo DRD
      • 12 O'Clock Labs Running Light Adapters
    • Brake Lines >
      • General Tips
      • Gen 1 Front Non-ABS
      • Gen 1 Rear Line
      • DL650 2007-2011 ABS
      • 2012 + , 2017+ DL650
      • 2014+ DL1000
    • Kawasaki Versys X300 >
      • X300 Versys High Fender Mount
      • Versys X300 Saddle Bag Guard Instructions
      • Versys X300 Fender Risers
      • Versys X300 GPS Mount/Shelf
    • Yamaha Parts Instructions >
      • FJ-09 Light Bar Install
      • Yamaha and Suzuki DR Mirror Extenders
  • Shorter/Taller Riders
  • Specials and Promotions
  • Favorite Projects
  • Adventure Motorcycling Links
  • Frequently Asked Questions
  • Contact Us
  • Photos
instructions_for_installing_a_2012_and_newer_dl650_fork_brace.pdf
File Size: 96 kb
File Type: pdf
Download File

First Generation Strom Fork Brace Instructions

2002 to 2012 DL1000
2004 to 2011 DL650

The brace comes with both halves bolted together with four bolts, two 35mm and two 25mm.
1.  Remove the bolts and separate the front and back halves.
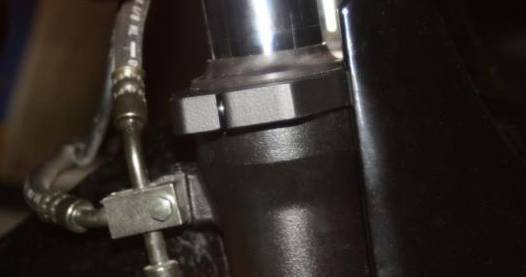
2.  Place the front piece of the brace (the larger piece) in place by sliding it down over the fork tubes.

Note:  The brace is exactly the size necessary to fit between the tubes.  It should be slid down over both tubes evenly at the same time.  Although not usually necessary, loosening the front axle pinch bolt eases installation and ensures the front forks are parallel.   Be sure to retighten the pinch bolt before riding. 

3.  Slide the back half into place being mindful of the brake hoses.
4.  Insert and hand tighten the two longer 35 mm bolts in the two inside holes. Make sure that the brace is
level with the top metal surface of the fork tube and some clearance exists between the brace and the
fender.  Refer to the pictures above.


Note: It's very important to tighten the two inside bolts first, before tightening the outside bolts.


5.  Insert the 25 mm bolts in the outer holes and hand tighten.


Note:  There will be a gap between the fork brace pieces on the outside. The gap allows the brace to tighten on the fork tubes.  Do not try to "close the gap" by over torqueing the bolts.


6.  Hand tight is good for the bolts. If you really want to use a torque wrench, be careful.  Do not exceed 11 foot pounds.  Use a torque wrench accurate for these light torque values.  A regular half inch torque wrench is not likely to be accurate at these low levels.

I don't use it myself, but temporary loctite is OK.


Picture
Order Page