AdventureTech, LLC.
Accessories for DL650 and DL1000 Suzuki V-Stroms, Yamaha FJ-09,
Kawasaki Versys X300 and other Adventure Motorcycles
  • Home
  • Parts by Type
    • Skid Plates >
      • SW Motech Skidpan to Givi Crashbar Adapter
    • Brake Pads and Lines >
      • Brake Pads
      • Braided Stainless Brake Lines
      • +2" Brake line Options
    • Chassis >
      • Fork Braces >
        • Fork Brace Reviews
      • Footpeg and Control Lowering Kit
      • Gear Shift Relocation/Extension
      • Passenger Peg Lowering
      • Crash Bars
      • Bolt-on Side Stand Foot >
        • Suzuki Side Stand Foot
        • Yamaha Side Stand Foot
      • Fender Raising Kits >
        • 2012+ DL650 Front Fender Riser
        • 2014+ DL1000 & DL1050 Fender Raising Kit
      • DL1000 Rear Wheel Spacer
    • Suspension >
      • Raising and Lowering Links >
        • Gen 1 and 2 DL650 and Gen 1 DL1000 >
          • About Materials
        • 2014+ DL1000 & DL1050
        • How Much Raise/Lowering do I need?
      • Aftermarket Rear Shocks
    • Electrical Accesories >
      • Signal Dynamics Heads Up Voltage Monitor
      • Switches
      • Connectors
      • Speedometer Correction/Calibrator
    • Lighting and Safety >
      • Auxiliary Lighting >
        • Suzuki Auxiliary LED Lighting >
          • Gen 1 V-Stroms Auxiliary Lighting
          • 2012 to 2016 DL650 Auxiliary Lighting
          • 2017+ DL650 Auxiliary Lighting
          • 2014+/2019 DL1000 Auxiliary Lighting
          • 2020+ DL1050 Auxiliary Lighting
          • DL800 Lighting
        • Yamaha Auxiliary Lighting
      • Running Light Adaptors for Turn Signals
      • Brake Light Modules >
        • BackOFF™ Brake Light Module
        • BackOFF™ Brake Hold Module
        • BackOFF™ XP Brake Light Module
        • Black Classic Dual LED License Plate Frame w/ Red LEDs & Red Lens
      • Headlight Modulators
    • Handlebar Controls and Mirrors >
      • Handlebar Risers
      • Mirror Extenders >
        • Suzuki Mirror Extenders
        • Yamaha Mirror Extenders
    • Shelves and GPS/Phone Mounts >
      • Auxiliary Shelves (main page) >
        • Typical Items Installed On a Shelves
        • Whats Fits
      • Over the Dash GPS Mounts
      • Over the Dash Shelf
      • Ram Mount Accessories
      • J&M Radio Mount
    • Luggage >
      • Saddle Bag Guards
      • Suzuki Hard Luggage
      • Yamaha Luggage
      • Shad Waterproof Soft Luggage >
        • SHAD 55L Waterproof Rear Travel Bag
        • W0SB42 Waterproof Saddle Bags
        • 38Liter Rear Duffle Bag Large
      • Tank Bags >
        • Givi XS319
        • ST605 5LTR Tank Lock Tank Bag
        • Givi XS307 Tankloc Tank Bag
      • Adventure to Givi Adapter
    • Windshields
    • Exhaust Systems >
      • Arrow Exhausts >
        • Arrow for DL650 2004 to 2011
        • Arrow for 2012 and Newer DL650
        • Arrow for 2014 and newer DL1000
      • Giannelli Exhaust
      • Remus Exhausts
  • Parts by Bike
    • DL650 2004 to 2011
    • DL650 2012 to 2016
    • DL650 2017 +
    • DL1000 2002 to 2013
    • DL1000 2014 to 2019
    • DL1050 2020+
    • 800 DE
    • Yamaha FJ-09/MT-09/Tracer 900 GT
    • Kawasaki Versys X300
  • Installation Instructions and Videos
    • V-Strom Parts Instructions >
      • Mirror Extender Instructions
      • Fork Brace Instructions
      • Footpeg and Control Lowering Instructions
      • Gear Shift Relocation Instructions
      • Bolt-on Kickstand Foot Instructions
      • Raising and Lowering Links >
        • DL650 and Gen 1 DL1000 Raising/Lowering Link Instructions
        • Gen 2 DL1000 Raising & Lowering Plates
      • Shelves and GPS Mounts >
        • Auxiliary Shelf Instructions
        • 1st Gen Strom Over the Dash GPS mount
        • Over the Dash Shelf for 2014+ DL1000
        • 2012 to 2016 DL650 GPS Mount Instructions
        • 2017+ DL650 GPS Mount
      • DL1000 Rear Wheel Spacer Instructions
      • Vee2 Saddlebag Guard
      • Fender Riser 2014+ DL1000
      • 2012+ DL650Fender Risers
      • Retrieving Missing Parts from the Cowling
      • Auxiliary Lighting >
        • Gen 1 V-Strom Light Bar
        • Auxiliary Light Wiring Harness
        • Wiring Harness Install DL800
        • 2014 and Newer DL1000 Light Bar
        • DL1050 Light Bar
        • V-Strom Wiring 101
    • General Electrical and Lighting >
      • Head's Up™ Voltage Monitor
      • Speedo DRD
      • 12 O'Clock Labs Running Light Adapters
    • Brake Lines >
      • General Tips
      • Gen 1 Front Non-ABS
      • Gen 1 Rear Line
      • DL650 2007-2011 ABS
      • 2012 + , 2017+ DL650
      • 2014+ DL1000
    • Kawasaki Versys X300 >
      • X300 Versys High Fender Mount
      • Versys X300 Saddle Bag Guard Instructions
      • Versys X300 Fender Risers
      • Versys X300 GPS Mount/Shelf
    • Yamaha Parts Instructions >
      • FJ-09 Light Bar Install
      • Yamaha and Suzuki DR Mirror Extenders
  • Shorter/Taller Riders
  • Specials and Promotions
  • Favorite Projects
  • Adventure Motorcycling Links
  • Frequently Asked Questions
  • Contact Us
  • Photos

Wiring Harness Installation
DL800


​Quick Guide:


​Red wire to battery Positive
Black wire to battery Negative
Yellow wire to a switch source
​Mount switch to clutch side mirror mount base.


Detailed instruction:


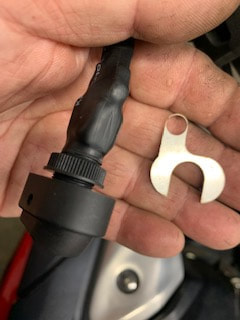
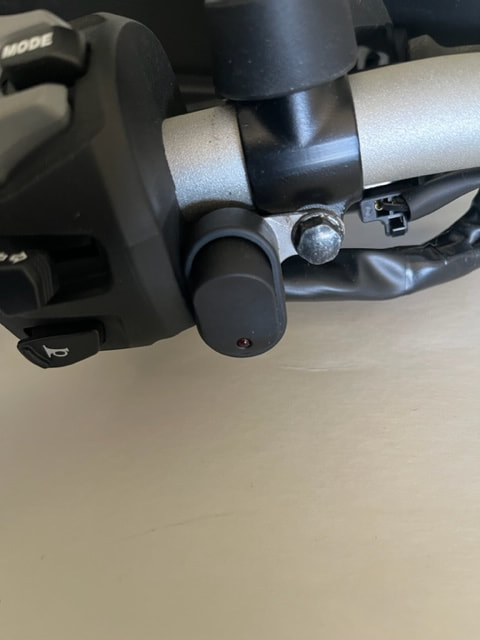
1.  Attach the switch to the clutch side mirror mount by removing one of the mounts bolts and re-installing through the ring on the switch.

It will be necessary to move the mirror mount to the right approximately 3/32 of an inch to allow the switch to fit between the mirror mount on the handle bar and the switchgear. 


NOTE:  The wires should be zipped tied with the switch in the desired location so that if the switch were to come loose from the holder the switch would still be located in approximately the desired position.  This also lessons strain on the switch holder.​​

NOTE:  The ring can be removed and re-oriented so the switch can be placed as desired.
​
Picture
Picture
 
2.  Leaving the yellow wire hanging free for now, but attach the first 6 to 8 inches of black sheathed wire from switch to existing wires from clutch side switch-gear with zip-ties.  

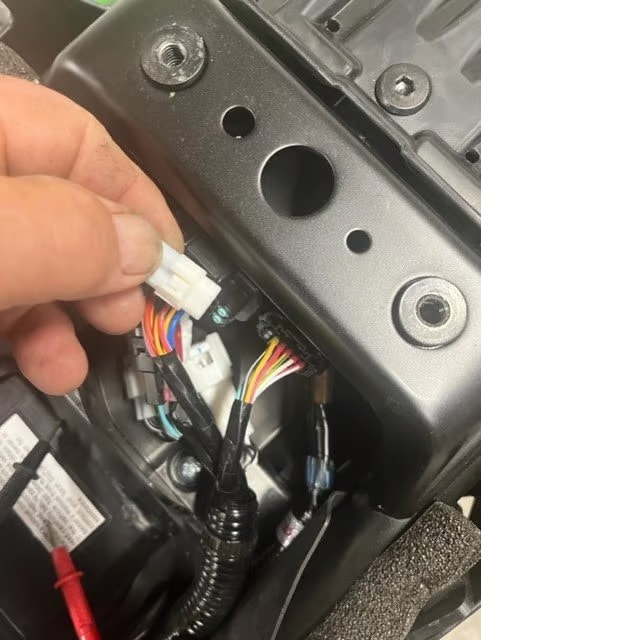
3.  Feed battery connections under tank and side panels on left side of the bike.  It is not necessary to remove or  loosen the fuel tank.  

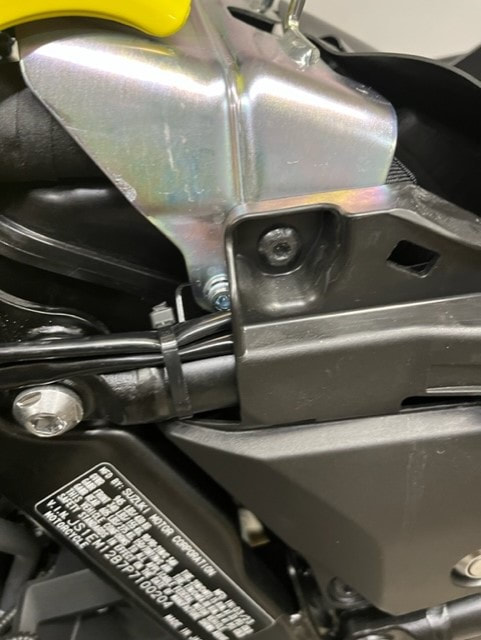
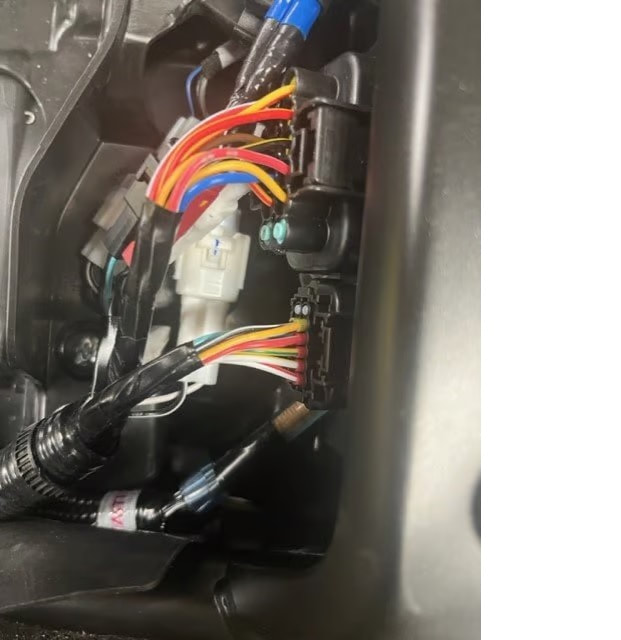
4.  Run wire with battery connection rings to the battery.  Secure harness to existing wires wire and route so that it will not become pinched during re-assembly and use.  The plastic brackets shown below can be removed with a 5 mm Allen wrench, the wires run behind the bracket, and the bracket re-installed.
Picture
​5.  Attach the battery connections, red to battery positive, black to battery negative.

NOTE:  Place a rag or other object to prevent the battery terminal nuts from falling into the void next to the battery. 

6.  Secure relay.  Here you can see it zip-tied to existing wiring in the front left side of the frame.  You could also use the tab on top of the relay to bolt the relay in place, but a zip tie works. 

​NOTE:  Be sure to check that full movement of the handlebars is not impeded by either placement of the relay or the wiring.  .Ignore the horn in the photo below.  It was a part of a dual horn upgrade on the bike used for photos. The photo is of the inside of the left side cowl area showing the main frame behind the steering head.
Picture
7.  Attach yellow wire to a 12 volt switched source. 

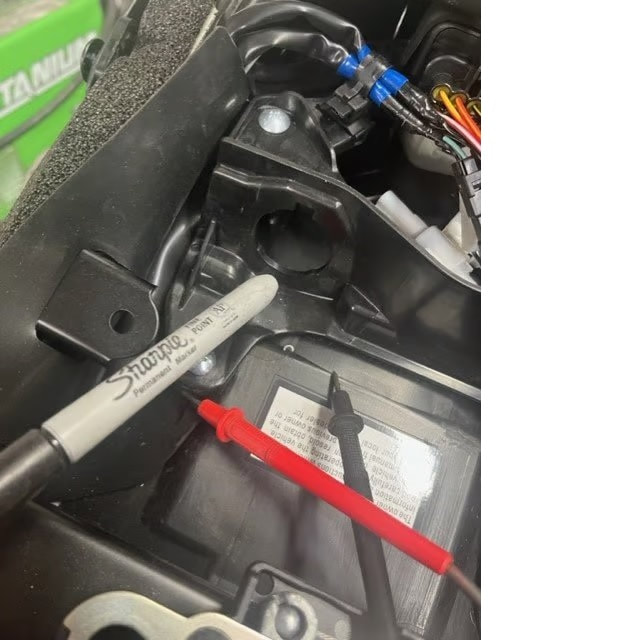
NOTE:  On 2023+ DL800s the positive power lead to the horn is a good choice.  Simply splice the yellow wire into the positive side wire. 

The yellow wire can also be extended and run back to the auxillary power port wires under the tail fairing.
Picture
Picture
Picture
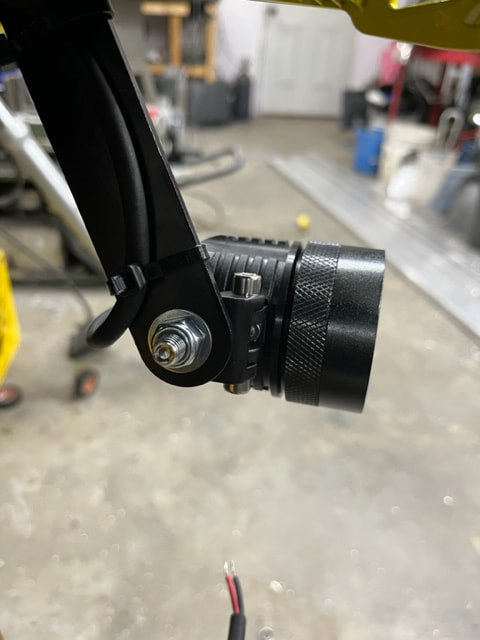
9.  Attach wires to lights and zip tie excess wire to existing wire in the fairing.  Place any excess wire in the area between the side panels and the tank.  Zip-tie in place.  ​
Picture
10. Check for unobstructed freedom of movement.  The handlebars should rotate without putting any stress on the wires.  

​12.  Go for a ride.