AdventureTech, LLC.
Accessories for DL650 and DL1000 Suzuki V-Stroms, Yamaha FJ-09,
Kawasaki Versys X300 and other Adventure Motorcycles
  • Home
  • Parts by Type
    • Skid Plates
    • Brake Pads and Lines >
      • Brake Pads
      • Braided Stainless Brake Lines
      • +2" Brake line Options
    • Chassis >
      • Fork Braces >
        • Fork Brace Reviews
      • Footpeg and Control Lowering Kit
      • Gear Shift Relocation/Extension
      • Passenger Peg Lowering
      • Crash Bars
      • Bolt-on Side Stand Foot >
        • Suzuki Side Stand Foot
        • Yamaha Side Stand Foot
      • Fender Raising Kits >
        • 2012+ DL650 Front Fender Riser
        • 2014+ DL1000 Fender Raising Kit
      • DL1000 Rear Wheel Spacer Exchange
    • Suspension >
      • Raising and Lowering Links >
        • Gen 1 and 2 DL650 and Gen 1 DL1000 >
          • About Materials
        • Gen 2 & 3 DL1000
        • How Much Raise/Lowering do I need?
      • Aftermarket Rear Shocks
    • Electrical Accesories >
      • Signal Dynamics Heads Up Voltage Monitor
      • Power Sockets
      • Switches
      • Connectors
      • Speedometer Correction/Calibrator
    • Lighting and Safety >
      • Auxiliary Lighting >
        • Suzuki Auxiliary LED Lighting >
          • Gen 1 V-Stroms Auxiliary Lighting
          • 2012 to 2016 DL650 Auxiliary Lighting
          • 2017+ DL650 Auxiliary Lighting
          • 2014+/2018+ DL1000 Auxiliary Lighting
        • Yamaha Auxiliary Lighting
      • Running Light Adaptors for Turn Signals
      • Brake Light Modules >
        • BackOFF™ Brake Light Module
        • BackOFF™ Brake Hold Module
        • BackOFF™ XP Brake Light Module
        • Black AYN License Frame and Module
        • Black Classic Dual LED License Plate Frame w/ Red LEDs & Red Lens
      • Headlight Modulators
    • Handlebar Controls and Mirrors >
      • Handlebar Risers
      • Mirror Extenders >
        • Suzuki Mirror Extenders
        • Yamaha Mirror Extenders
      • Foam Grip Covers
    • Shelves and GPS/Phone Mounts >
      • Auxiliary Shelves (main page) >
        • Typical Items Installed On a Shelves
        • Whats Fits
      • Over the Dash GPS Mounts
      • Over the Dash Shelf
      • Ram Mount Accessories
      • J&M Radio Mount
    • Luggage >
      • Saddle Bag Guards
      • Rear Top Racks
      • Suzuki Hard Luggage
      • Yamaha Luggage
      • Shad Waterproof Soft Luggage >
        • SHAD 55L Waterproof Rear Travel Bag
        • W0SB42 Waterproof Saddle Bags
        • 38Liter Rear Duffle Bag Large
      • Tank Bags >
        • Givi XS319
        • ST605 5LTR Tank Lock Tank Bag
        • Givi XS307 Tankloc Tank Bag
        • Givi XS308 Tankloc Tank Bag
      • Adventure to Givi Adapter
    • Windshields
    • Exhaust Systems >
      • Arrow Exhausts >
        • Arrow for DL650 2004 to 2011
        • Arrow for 2012 and Newer DL650
        • Arrow for 2014 and newer DL1000
      • Giannelli Exhaust
      • Remus Exhausts
    • Seats
  • Parts by Bike
    • DL650 2004 to 2011
    • DL650 2012 to 2016
    • DL650 2017 +
    • DL1000 2002 to 2013
    • DL1000 2014 to 2018
    • DRZ400
    • Yamaha FJ-09
    • Kawasaki Versys X300
  • Installation Instructions and Videos
    • V-Strom Parts Instructions >
      • Mirror Extender Instructions
      • Fork Brace Instructions
      • Footpeg and Control Lowering Instructions
      • Gear Shift Relocation Instructions
      • Bolt-on Kickstand Foot Instructions
      • Raising and Lowering Links >
        • DL650 and Gen 1 DL1000 Raising/Lowering Link Instructions
        • Gen 2 DL1000 Raising & Lowering Plates
      • Shelves and GPS Mounts >
        • Auxiliary Shelf Instructions
        • 1st Gen Strom Over the Dash GPS mount
        • Over the Dash Shelf for 2014+ DL1000
        • 2012 and newer DL650 GPS Mount Instructions
      • DL1000 Rear Wheel Spacer Instructions
      • Vee2 Saddlebag Guard
      • Fender Riser 2014+ DL1000
      • Retrieving Missing Parts from the Cowling
      • Auxiliary Lighting >
        • Gen 1 V-Strom Light Bar
        • Auxiliary Light Wiring Harness
        • 2014 and Newer DL1000 Light Bar
        • V-Strom Wiring 101
    • General Electrical and Lighting >
      • Head's Up™ Voltage Monitor
      • Speedo DRD
      • 12 O'Clock Labs Running Light Adapters
    • Brake Lines >
      • General Tips
      • Gen 1 Front Non-ABS
      • Gen 1 Rear Line
      • DL650 2007-2011 ABS
      • 2012 + , 2017+ DL650
      • 2014+ DL1000
    • Kawasaki Versys X300 >
      • Versys X300 Saddle Bag Guard Instructions
      • Versys X300 Fender Risers
      • Versys X300 GPS Mount/Shelf
    • Yamaha Parts Instructions >
      • FJ-09 Light Bar Install
      • Yamaha and Suzuki DR Mirror Extenders
  • Shorter/Taller Riders
  • All Parts
  • Specials and Promotions
  • Favorite Projects
  • Events
  • V-Strom Community Supporters
  • Adventure Motorcycling Links
  • Frequently Asked Questions
  • Contact Us
  • Photos

Versys X300 Fender Riser
Installation Instructions

Picture
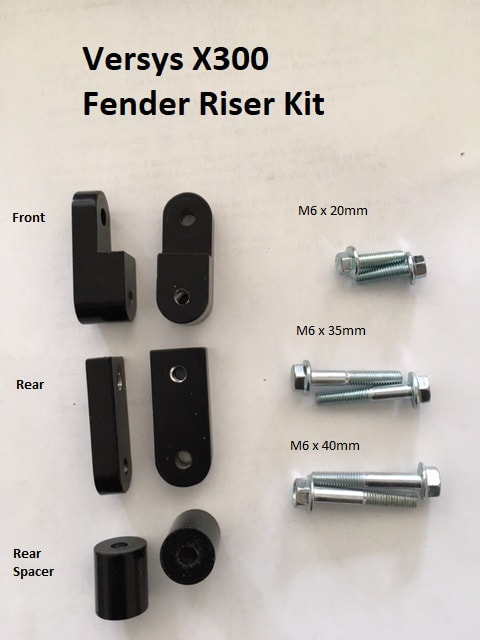
Tools needed:  8mm and 10mm open/box end wrench, 5mm allen wrench.
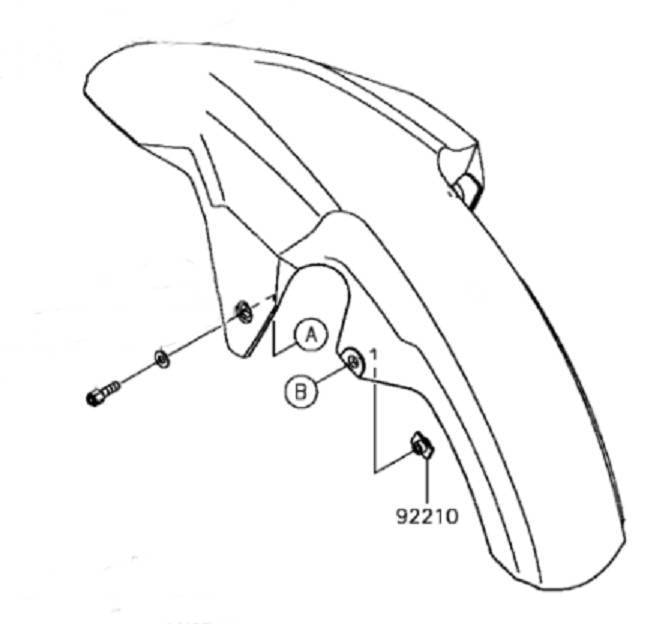
Remove Front Fender

1.  Remove all four button head mounting screws attaching the front fender with a 5mm allen wrench.  See locations A and B below.
Picture
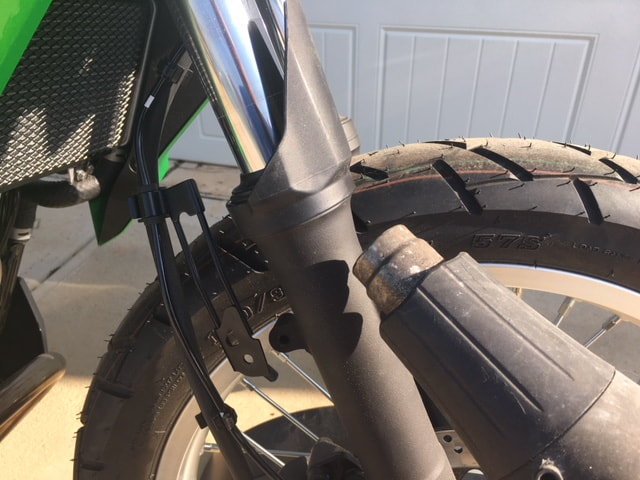
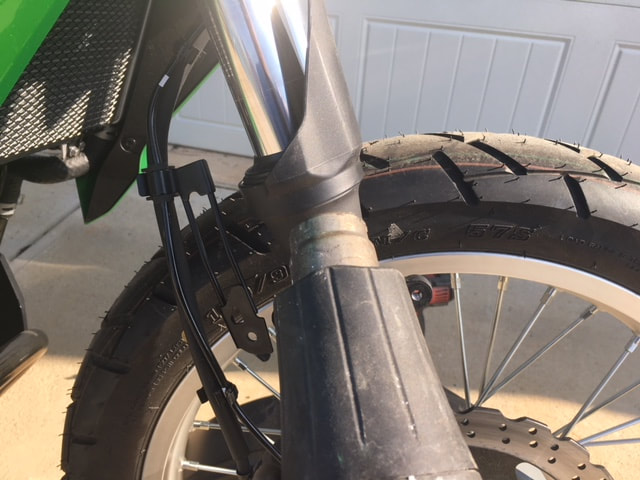
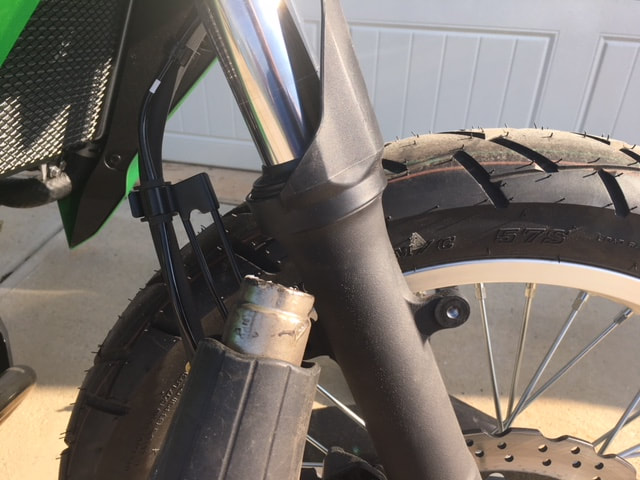
Remove Plastic Fork Guards

Important:  Be careful not to direct heat at the fork seals.


Using a heat gun on low setting or a hair dryer, heat the plastic guards to soften them.  Direct the hot air from the bottom of the guard up so as not to heat the fork seal.  As teh plastic softens gently pull the guard forward.  When soft it will be easy to cut the guard free with a pair of scissors or razor   
​
Picture
Picture
Picture
Remove Front Wheel

The front tire/wheel blocks access must be removed or be free to move from side to side to continue.  Remove front axle in accordance with normal maintenance procedures to allow the front wheel to be moved out of the way.

​Attach Front Fender Riser

Attach front fender riser to front fender mount with a 20mm bolt using an 8mm wrench.  Just snug up the bolt at this time to allow some movement for fitting the front fender later.
Attach Rear Riser

Attach the rear fender risers using a 35mm bolt and 10mm wrench.  Note flat end goes on the bottom and bolt head goes on the inside.
Replace front Fender

Slide the front fender into place and secure to the new higher fender mounting points using the original front button head screws.

​Note:  Once the front axle is removed the fork tubes can turn freely.  In teh picture above you can see the right side fork tube is turned slightly to the inside.  If your having trouble lining up the fender check to make sure the fork tubes are lined up parallel.
Insert spacers between rear fender and rear risers.  See photos below.  Secure fender with 40mm flange head bolts supplied with kit.
Tighten all Bolts

At this time go back and tighten all the bolts used for the fender riser kit and to secure the fender.
Replace The Front Wheel.

Replace the front wheel using standard maintenance procures.