Headlight Modulator for Wee, Glee, and Vee
ALL DL650s, DL1000 2002 to 2011
|
|
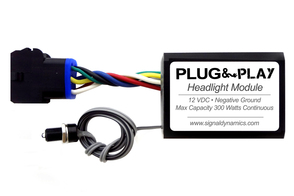
Headlight Module $74.95 + Plug & Play™ Dual H4 Harness Adapter for dual headlight V-Stroms $14.95 = Retail $89.90
Our Price: $96.90 for both pieces
Note:
Does not fit the Vee2/Vee3 (2014+ DL1000), or Wee3 (2017+ DL650). These models require the universal splice-in harness.
Our Price: $96.90 for both pieces
Note:
Does not fit the Vee2/Vee3 (2014+ DL1000), or Wee3 (2017+ DL650). These models require the universal splice-in harness.
Note for International Customers: Insurance and delivery confirmation is required for this item. International customers should contact us for shipping quotes using Express Mail.
A headlight module increases your daytime visiblity by modulating your incandescent headlight (think flashing, but not quite..) from about 30% intensity to 100% intensity about 4 times per second. When approaching oncoming traffic, your modulating headlight will help you become 10x more visible compared to a standard motorcycle headlight, drastically reducing the risk of potentially fatal collisions involving automobiles. It sounds like it is about time to get a Plug & Play™ Headlight module, right? This module isn't like all the rest you've seen, take a look at the advanced features of a Signal Dynamics Plug & Play™ Headlight Module below!
Features
Toggle Modulation ON and OFF The modulation of the headlight can be toggled on and off by the user during daytime hours, as per DOT regualtions this feature does is not available at night. When the bike is started the default is modulation ON. To turn the modulation on or off simply switch your bikes high low beam switch to the opposite position, and then back to the original position within one second (this can be done with the switch in either the high or low beam position).
Full Function You do not have to compromise between the high beam and low beam with a Signal Dynamics Plug & Play™ Headlight Module because this module will modulate your high OR low beam headlight(s)... you get to choose whenever you want! This feature is useful along with the ON/OFF feature: i.e. You're riding in heavy traffic and you don't want to annoy the bumper to bumper traffic ahead of you, so you switch your modulating low beam(s) off and turn on your solid non-modulating high beam(s).
Auto Night Shut-Off The Plug & Play™ Headlight Module is designed to automatically turn on and off at specific light levels in order to comply with the DOT's regulation of no night time modulation.
Switch From Max to Min Mode This module is equipped with two levels of modulation to meet your visibility requirements. (Both are fully DOT compliant). The default level is "Max" when the bike is turned on, but can easily be toggled to "Min" or back to "Max" by simply pressing the horn button twice within one second.
Heads Up Alert Feature The Headlight Module harness has a green wire that can be connected to your horn wire in order to add a visual alert to your horn's audible alert. Pressing the horn will cause your headlight to modulate for 3 seconds (if the module is off) and then return to steady on; If your headlight is already modulating it will instead toggle between min and max mode for 3 seconds, thus giving you a faster flash rate for 3 seconds to give that approaching vehicle a 'head's up'.
Emergency Headlight Feature The Headlight Module is constantly monitoring the bulb that you have selected (high beam or low beam). In the event the bulb(s) should fail; the alternate bulb(s) will instantly be turned on. This switching will only be done once; when the bike is turned off and then back on. Additionally you will not have use of the bulb that failed until it is repaired or replaced. While the Heads-Up™ Alert feature will continue to function in the event of a headlight failure, the headlight will not modulate otherwise. If you find you cannot get your headlight to modulate, check the bulb.
No Excessive Heat Build-Up Handles high power demand sealed beam and halogen headlights totaling up to 130 watts! Operates efficiently with only slight increase above ambient temperature at continuous max headlight power rating.
Surge Protected Internal protection against transient voltage spikes during engine starts or charging system operation. Also drops out if voltage is too low, avoiding problems associated with low voltage.
Fitment & Required Harness Options
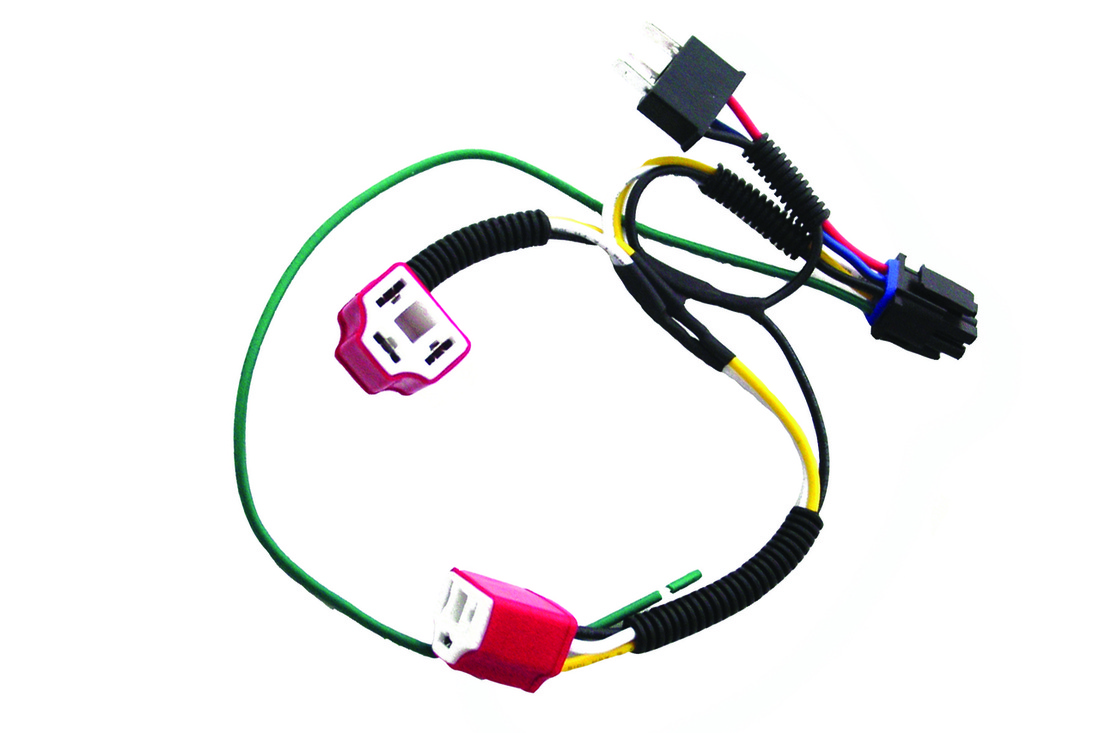
In order to use the Plug and Play™ Headlight Module you MUST also purchase the appropriate adapter harness for your motorcycle (sold separately). If you are unsure of which adapter harness your motorcycle needs, please refer to your owner's manual or local dealership to verify the type of headlight bulb your motorcycle uses; alternatively you can view our compatibility chart to see what known motorcycles will fit our adapter harnesses.
Installation
To install a Plug & Play™ Headlight Module and Harness adapter, under normal circumstances, all you need to do is essentially Plug & Play™! To begin, locate your headlight connector(s), this may require some disassembly of your fairings. Next you will need to simply disconnect your existing headlight plug(s). Now take the your motorcycle headlight plug (left plug for dual headlights and secure the unused right plug aside) and connect to the black harness adapter plug, then connect the opposite end of the harness adapter to the back of your headlight plug(s). Connect the 6 pin male connector from the adapter harness to the 6 pin female connector on the Plug & Play™ Headlight Module (this connector is polarized so it can only connect one way). Once everything is connected you will need to mount the optic sensor (grey or black wire with a photo eye on the end). We recommend mounting the optic sensor in a water protected area facing the road. Under the fairing pointed at the front fender is usually a good location. It is very important that the optic sensor is not facing toward the sky or directly at oncoming traffic, as headlights and street lights at night may cause the headlight module to activate. For those who would like a more permanent installation of the "Day Light Sensor", a 5/16 hole can be drilled into fairing. Otherwise, it can be secured to one of the bikes wires or cables with the zip tie. If you would like to utilize the "Heads-Up" Alert feature use the included blue tap splice connector to connect the green wire from the harness adapter to the bike’s horn wire. The bike’s horn wire is the wire that connects the bike’s horn button to the bike’s horn. Note: there only two wires on the horn itself and one of them is where the green wire connects. Choosing the wrong wire will not harm the module or the bike in anyway; The Heads Up Alert feature just will not work. To finish up, mount the Headlight Module with the enclosed adhesive pad and secure all wiring in a manner that will not interfere with any of the bike’s controls. To test the module use an incandescent light source or move outdoors during the day - fluorescent shop lights and LED lighting will not activate the module.
Features
Toggle Modulation ON and OFF The modulation of the headlight can be toggled on and off by the user during daytime hours, as per DOT regualtions this feature does is not available at night. When the bike is started the default is modulation ON. To turn the modulation on or off simply switch your bikes high low beam switch to the opposite position, and then back to the original position within one second (this can be done with the switch in either the high or low beam position).
Full Function You do not have to compromise between the high beam and low beam with a Signal Dynamics Plug & Play™ Headlight Module because this module will modulate your high OR low beam headlight(s)... you get to choose whenever you want! This feature is useful along with the ON/OFF feature: i.e. You're riding in heavy traffic and you don't want to annoy the bumper to bumper traffic ahead of you, so you switch your modulating low beam(s) off and turn on your solid non-modulating high beam(s).
Auto Night Shut-Off The Plug & Play™ Headlight Module is designed to automatically turn on and off at specific light levels in order to comply with the DOT's regulation of no night time modulation.
Switch From Max to Min Mode This module is equipped with two levels of modulation to meet your visibility requirements. (Both are fully DOT compliant). The default level is "Max" when the bike is turned on, but can easily be toggled to "Min" or back to "Max" by simply pressing the horn button twice within one second.
Heads Up Alert Feature The Headlight Module harness has a green wire that can be connected to your horn wire in order to add a visual alert to your horn's audible alert. Pressing the horn will cause your headlight to modulate for 3 seconds (if the module is off) and then return to steady on; If your headlight is already modulating it will instead toggle between min and max mode for 3 seconds, thus giving you a faster flash rate for 3 seconds to give that approaching vehicle a 'head's up'.
Emergency Headlight Feature The Headlight Module is constantly monitoring the bulb that you have selected (high beam or low beam). In the event the bulb(s) should fail; the alternate bulb(s) will instantly be turned on. This switching will only be done once; when the bike is turned off and then back on. Additionally you will not have use of the bulb that failed until it is repaired or replaced. While the Heads-Up™ Alert feature will continue to function in the event of a headlight failure, the headlight will not modulate otherwise. If you find you cannot get your headlight to modulate, check the bulb.
No Excessive Heat Build-Up Handles high power demand sealed beam and halogen headlights totaling up to 130 watts! Operates efficiently with only slight increase above ambient temperature at continuous max headlight power rating.
Surge Protected Internal protection against transient voltage spikes during engine starts or charging system operation. Also drops out if voltage is too low, avoiding problems associated with low voltage.
Fitment & Required Harness Options
In order to use the Plug and Play™ Headlight Module you MUST also purchase the appropriate adapter harness for your motorcycle (sold separately). If you are unsure of which adapter harness your motorcycle needs, please refer to your owner's manual or local dealership to verify the type of headlight bulb your motorcycle uses; alternatively you can view our compatibility chart to see what known motorcycles will fit our adapter harnesses.
Installation
To install a Plug & Play™ Headlight Module and Harness adapter, under normal circumstances, all you need to do is essentially Plug & Play™! To begin, locate your headlight connector(s), this may require some disassembly of your fairings. Next you will need to simply disconnect your existing headlight plug(s). Now take the your motorcycle headlight plug (left plug for dual headlights and secure the unused right plug aside) and connect to the black harness adapter plug, then connect the opposite end of the harness adapter to the back of your headlight plug(s). Connect the 6 pin male connector from the adapter harness to the 6 pin female connector on the Plug & Play™ Headlight Module (this connector is polarized so it can only connect one way). Once everything is connected you will need to mount the optic sensor (grey or black wire with a photo eye on the end). We recommend mounting the optic sensor in a water protected area facing the road. Under the fairing pointed at the front fender is usually a good location. It is very important that the optic sensor is not facing toward the sky or directly at oncoming traffic, as headlights and street lights at night may cause the headlight module to activate. For those who would like a more permanent installation of the "Day Light Sensor", a 5/16 hole can be drilled into fairing. Otherwise, it can be secured to one of the bikes wires or cables with the zip tie. If you would like to utilize the "Heads-Up" Alert feature use the included blue tap splice connector to connect the green wire from the harness adapter to the bike’s horn wire. The bike’s horn wire is the wire that connects the bike’s horn button to the bike’s horn. Note: there only two wires on the horn itself and one of them is where the green wire connects. Choosing the wrong wire will not harm the module or the bike in anyway; The Heads Up Alert feature just will not work. To finish up, mount the Headlight Module with the enclosed adhesive pad and secure all wiring in a manner that will not interfere with any of the bike’s controls. To test the module use an incandescent light source or move outdoors during the day - fluorescent shop lights and LED lighting will not activate the module.