Footpeg and Control Lowering Kit
Brake Side
1. Place a straight edge on the foot peg to see the position of the brake lever in relation to the foot-peg. For reference, the factory recommended adjustment "A" below, is 0.8 to 1.2".
1. Place a straight edge on the foot peg to see the position of the brake lever in relation to the foot-peg. For reference, the factory recommended adjustment "A" below, is 0.8 to 1.2".

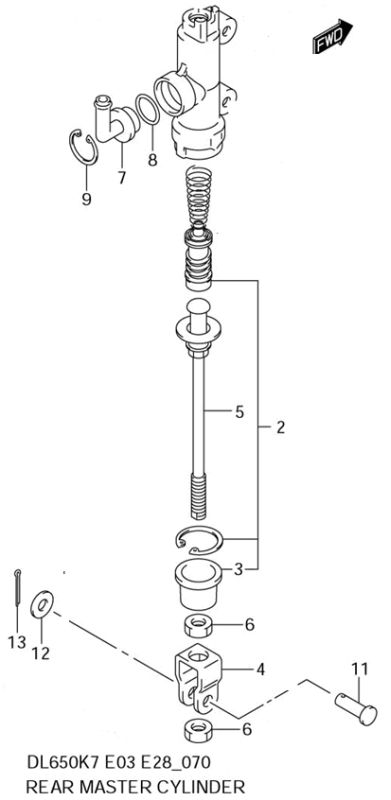
2. Remove the cotter pin (#13) and the pin (#11) from the yoke (#4).
3. Remove the two bolts that hold the stock foot-peg and control plates to the frame and remove the foot-peg/control plates.
4. Attach the adapter plate to the stock foot-peg and control plate using the flush mount screws and ny-lock nuts.
5. DL1000 only - Attach extension to brake lever (looks a little like a paperclip). Attach the extension to the stock brake switch connector (spring). An extension spring is not needed for the DL650.
6. Attach the adapter plate to the frame using the stock button socket head screws removed earlier. Blue Locktite 242 may be desriable.
7. Place one jam-nut (stock or new, it doesn't matter) on the rear brake cylinder push rod. Screw up the rod so that one full thread is above the nut.
8. Screw the coupling nut onto the rear brake push rod.
9. Screw the set-screw into the coupling nut. Note that the set screw has one end that accepts an allen screw.
10. Screw a jam-nut onto the set screw.
11. Insert the set-screw into the yoke that previously attached the brake push rod to the rear brake lever.
12. Insert a jam nut into the yoke and tighten the jam-nut on the set=screw.
13. Adjust the brake lever hieght by adjusting the position of the coupling nut and jam-nuts.
Note to DL650 ABS owners - You may need to cut a zip tie holdingf the electrical harness to the frame to free up some slack in the rear brake electrical line. The zip tie is located under the seat behind the seat behind the tank.
Gear shift side:
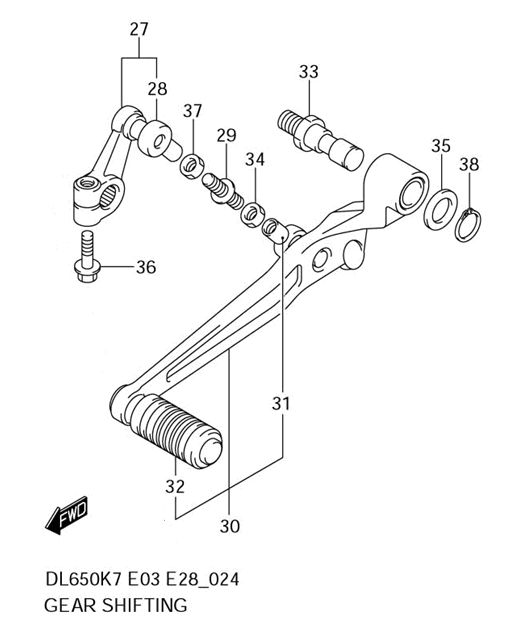
1. Place a straight edge on the foot peg to see the existing position of the gear shift lever in relation to the foot-peg.
NOTE THE ORIENTATION OF THE SHIFT LINKAGE TO THE SHIFTER SHAFT. ON THE DL650 IT IS AS SHOWN ABOVE. ON THE DL1000 THE LINKAGE IS BELOW THE SHAFT.
2. Loosen and COMPLETELY withdraw/remove the bolt (part #36) that holds the shift arm (#27) to the gear shift shaft (#18)
3. Remove the two bolts that hold the stock foot-peg and control plates to the frame.
4. Remove the foot-peg/control plates from the frame and slide the gear shift arm from the gear shift shaft.
5. Attach the adapter plate to the stock foot-peg and control plate with flush mount screws and ny-lock nuts.
6. Attach the adapter plate to the frame using the stock button socket head screws removed earlier. Again, blue Locktite 242 may be desirable.
7. Slide the gear shift arm over the gear shaft shaft in the position that results in the closest approximation of the stock position abserved in setp 1.
MAKE SURE THE ORIENTATION OF THE SHIFETR LINK TO THE SHIFTER SHAFT IS SIMILAR TO ORIGINAL.
8. Re-install and tighten the shift arm retaining bolt (part #36).