AdventureTech, LLC.
Accessories for DL650 and DL1000 Suzuki V-Stroms, Yamaha FJ-09,
Kawasaki Versys X300 and other Adventure Motorcycles
  • Home
  • Parts by Type
    • Skid Plates >
      • SW Motech Skidpan to Givi Crashbar Adapter
    • Brake Pads and Lines >
      • Brake Pads
      • Braided Stainless Brake Lines
      • +2" Brake line Options
    • Chassis >
      • Fork Braces >
        • Fork Brace Reviews
      • Footpeg and Control Lowering Kit
      • Gear Shift Relocation/Extension
      • Passenger Peg Lowering
      • Crash Bars
      • Bolt-on Side Stand Foot >
        • Suzuki Side Stand Foot
        • Yamaha Side Stand Foot
      • Fender Raising Kits >
        • 2012+ DL650 Front Fender Riser
        • 2014+ DL1000 & DL1050 Fender Raising Kit
      • DL1000 Rear Wheel Spacer
    • Suspension >
      • Raising and Lowering Links >
        • Gen 1 and 2 DL650 and Gen 1 DL1000 >
          • About Materials
        • 2014+ DL1000 & DL1050
        • How Much Raise/Lowering do I need?
      • Aftermarket Rear Shocks
    • Electrical Accesories >
      • Signal Dynamics Heads Up Voltage Monitor
      • Switches
      • Connectors
      • Speedometer Correction/Calibrator
    • Lighting and Safety >
      • Auxiliary Lighting >
        • Suzuki Auxiliary LED Lighting >
          • Gen 1 V-Stroms Auxiliary Lighting
          • 2012 to 2016 DL650 Auxiliary Lighting
          • 2017+ DL650 Auxiliary Lighting
          • 2014+/2019 DL1000 Auxiliary Lighting
          • 2020+ DL1050 Auxiliary Lighting
        • Yamaha Auxiliary Lighting
      • Running Light Adaptors for Turn Signals
      • Brake Light Modules >
        • BackOFF™ Brake Light Module
        • BackOFF™ Brake Hold Module
        • BackOFF™ XP Brake Light Module
        • Black Classic Dual LED License Plate Frame w/ Red LEDs & Red Lens
      • Headlight Modulators
    • Handlebar Controls and Mirrors >
      • Handlebar Risers
      • Mirror Extenders >
        • Suzuki Mirror Extenders
        • Yamaha Mirror Extenders
    • Shelves and GPS/Phone Mounts >
      • Auxiliary Shelves (main page) >
        • Typical Items Installed On a Shelves
        • Whats Fits
      • Over the Dash GPS Mounts
      • Over the Dash Shelf
      • Ram Mount Accessories
      • J&M Radio Mount
    • Luggage >
      • Saddle Bag Guards
      • Suzuki Hard Luggage
      • Yamaha Luggage
      • Shad Waterproof Soft Luggage >
        • SHAD 55L Waterproof Rear Travel Bag
        • W0SB42 Waterproof Saddle Bags
        • 38Liter Rear Duffle Bag Large
      • Tank Bags >
        • Givi XS319
        • ST605 5LTR Tank Lock Tank Bag
        • Givi XS307 Tankloc Tank Bag
      • Adventure to Givi Adapter
    • Windshields
    • Exhaust Systems >
      • Arrow Exhausts >
        • Arrow for DL650 2004 to 2011
        • Arrow for 2012 and Newer DL650
        • Arrow for 2014 and newer DL1000
      • Giannelli Exhaust
      • Remus Exhausts
  • Parts by Bike
    • DL650 2004 to 2011
    • DL650 2012 to 2016
    • DL650 2017 +
    • DL1000 2002 to 2013
    • DL1000 2014 to 2019
    • DL1050 2020+
    • DRZ400
    • Yamaha FJ-09/MT-09/Tracer 900 GT
    • Kawasaki Versys X300
  • Installation Instructions and Videos
    • V-Strom Parts Instructions >
      • Mirror Extender Instructions
      • Fork Brace Instructions
      • Footpeg and Control Lowering Instructions
      • Gear Shift Relocation Instructions
      • Bolt-on Kickstand Foot Instructions
      • Raising and Lowering Links >
        • DL650 and Gen 1 DL1000 Raising/Lowering Link Instructions
        • Gen 2 DL1000 Raising & Lowering Plates
      • Shelves and GPS Mounts >
        • Auxiliary Shelf Instructions
        • 1st Gen Strom Over the Dash GPS mount
        • Over the Dash Shelf for 2014+ DL1000
        • 2012 to 2016 DL650 GPS Mount Instructions
        • 2017+ DL650 GPS Mount
      • DL1000 Rear Wheel Spacer Instructions
      • Vee2 Saddlebag Guard
      • Fender Riser 2014+ DL1000
      • 2012+ DL650Fender Risers
      • Retrieving Missing Parts from the Cowling
      • Auxiliary Lighting >
        • Gen 1 V-Strom Light Bar
        • Auxiliary Light Wiring Harness
        • 2014 and Newer DL1000 Light Bar
        • DL1050 Light Bar
        • V-Strom Wiring 101
    • General Electrical and Lighting >
      • Head's Up™ Voltage Monitor
      • Speedo DRD
      • 12 O'Clock Labs Running Light Adapters
    • Brake Lines >
      • General Tips
      • Gen 1 Front Non-ABS
      • Gen 1 Rear Line
      • DL650 2007-2011 ABS
      • 2012 + , 2017+ DL650
      • 2014+ DL1000
    • Kawasaki Versys X300 >
      • X300 Versys High Fender Mount
      • Versys X300 Saddle Bag Guard Instructions
      • Versys X300 Fender Risers
      • Versys X300 GPS Mount/Shelf
    • Yamaha Parts Instructions >
      • FJ-09 Light Bar Install
      • Yamaha and Suzuki DR Mirror Extenders
  • Shorter/Taller Riders
  • Specials and Promotions
  • Favorite Projects
  • Adventure Motorcycling Links
  • Frequently Asked Questions
  • Contact Us
  • Photos

2012+ DL650 Fender Risers
​Installation Instructions

Picture
 
1.  If a fork brace is installed remove it.

2.  Remove front fender.  Save the bolts for reuse.

Important Note: Sometime late in the last decade around 2017 Suzuki changed the molds use to cast the DL650 forks.  In earlier years the front fender front mounting points were cylindrical.  In later years the mounting points became slightly conical.  More on that below.

3. Examine fender riser and note one hole is threaded and one hole is clean with no threads.  The threaded hole goes on top.

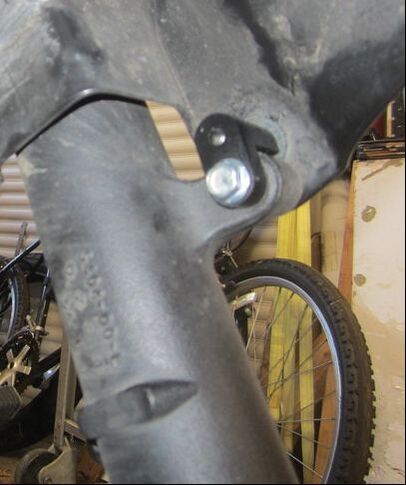
4.  Place fender riser for one side on the front mounting point using the M6 x 25 mm bolt supplied with the kit.  

At this point it should be clear if the fork leg has a cylindrical or conical mount.  If the mount is conical the fender riser will not sit flat on top of the mount.  The mount will need to be flattened with a file so the riser fits well.

The bolt goes through the clean lower hole into the fork leg fender mount from the wheel side of the fork.  Just snug up the bolt so that the fender still moves for now.  .

Picture
5.  Repeat for other side.

​6.  Re-install the fork brace.  See instructions here.  https://www.adventuretech.biz/fork-brace-instructions.html

​7. Adjust the angle of the fender so that there is an equal amount of clearance around tire at both ends of the fender.

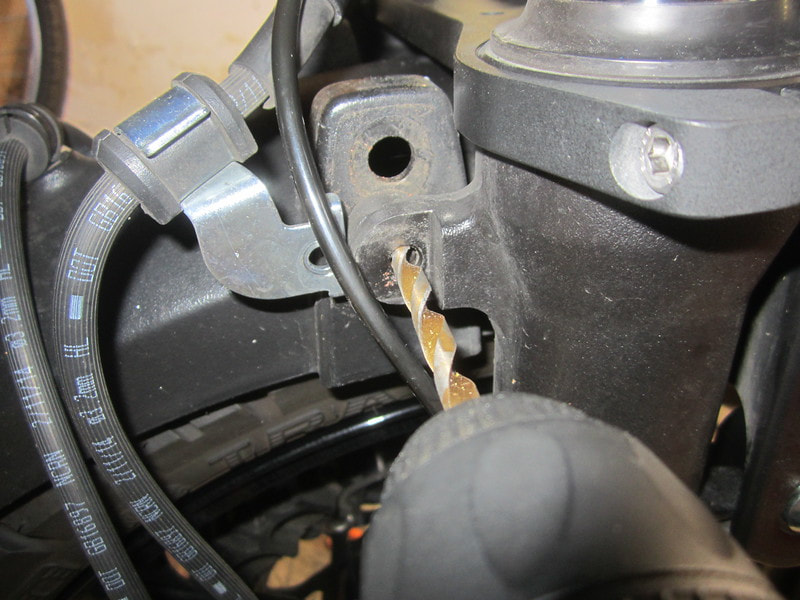
8.  Using a drill bit that just fits through the fork lug without removing any material make a pilot mark. Move the ABS sensor wire out of the way first.
Picture
9.  Move teh fender down and drill the hole through using the same drill bit.
Picture

Picture
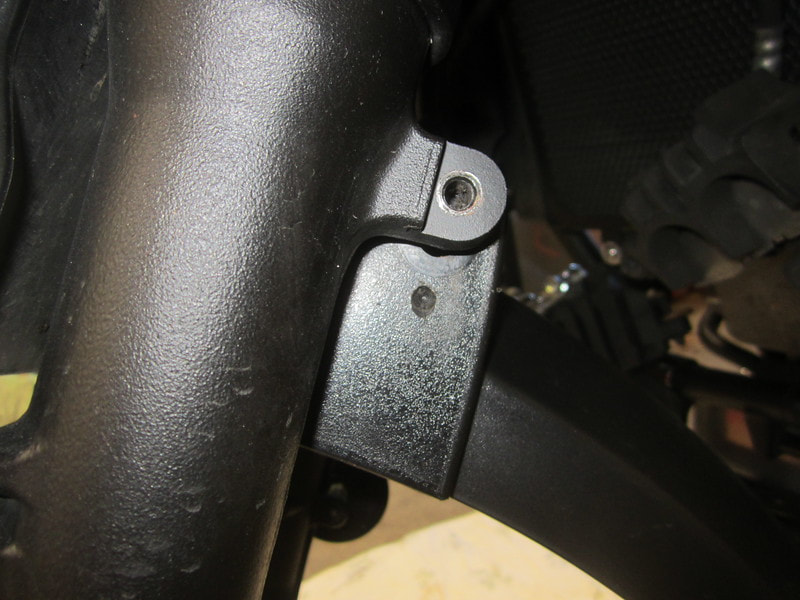
10.  Install rear front fender hardware using new hole.

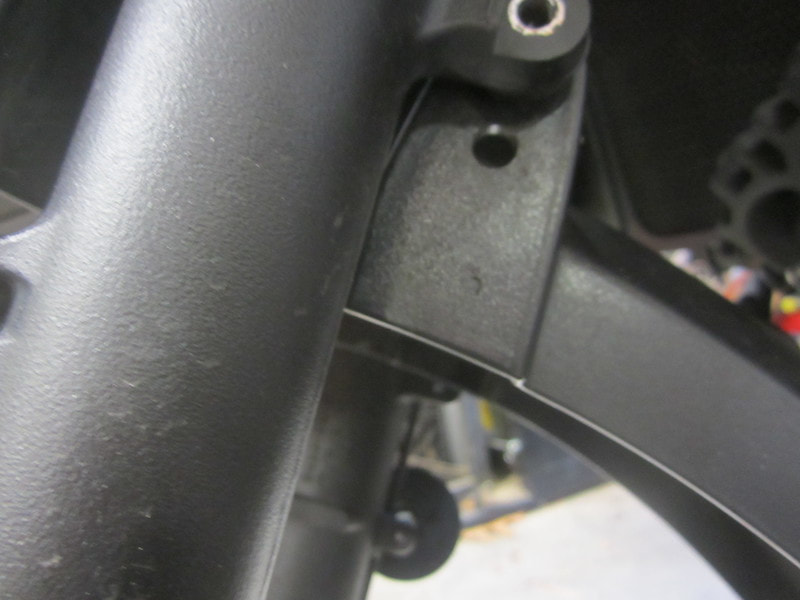
11.  Make pilot mark on the other side and drill hole as above for the other side.

12.  Tighten all fastners.  

Additional guidance can be found here.